Last Updated on October, 2024
Ever wanted to build your own dog kennel for your pooch instead of buying one?
If so, you’re at the right place.
Dog kennels, if appropriately built, can be much more comfortable for the dog and can look way more attractive than buying one. TRUST ME!
With the right dog kennel plans, you can come up with a beautiful place for your furry friend to spend time on.
Below, I’ve put out my way of building the perfect kennel for your canine companion. It’s straightforward and needs way less tools and materials to get started.
If you’re ready, take some woods and start building the dream home for your four-legged friend.
Contents
Right Tools and Materials Needed to Start Building the Dog Crate

Right tools are a must before getting started with any woodworking projects. If you’re to build a perfect dog crate, you’ll need these tools:
- 1-3/8-inch spade bit with spur cutters
- Hammer
- Hand stapler
- Brush
- Sawhorses
- Utility knife with regular and shingle-cutting hook blades
- Orbital sander & medium-grit sandpaper
- Drill with screw-driving attachment & assorted drill bits and countersink bit
- Framing square
- Clamps
- Tape Measure
- Miter saw
- Jigsaw with cross-cut blade
- Circular saw with plywood-cutting blade
- 2×4 x 8′ pressure-treated board
- 2×2 x 6′ fir or cedar board
- 1-1/4″ galvanized wood screws
- Low-VOC paint or stain
- 15-lb. asphalt-impregnated felt roofing paper
- 3″ galvanized wood screws
- 3/4″ sheet of exterior-grade plywood (not pressure-treated)
- 3/8″ galvanized staples
- 3/4″ galvanized roofing nails
- Roofing cement
- 1 bundle (or about 12) 3-tab asphalt shingles
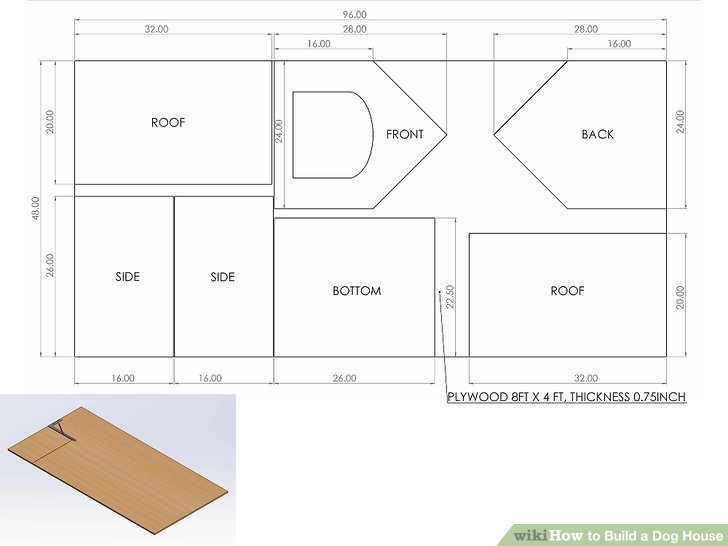
Cut List
For the base, cut the 2×4 you’ve got into four pieces:
- Two at 22-1/2 “long
- Two at 23″ long
For the framing, cut the 2×2 fir or cedar you’ve got into eight pieces:
- Four corner framing 15″ long
- Four roof framing 13″ long
Beginning With Building of the Base
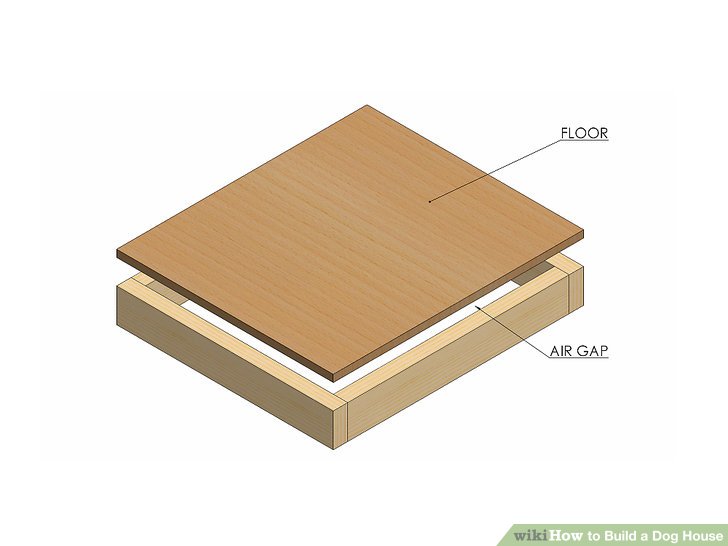
Before anything, you’ll need a strong base, and that’s what you’ll be focusing on. But before you get started, it’s crucial that you decide what’ll go into the base of your dog crate.
Failing to get the base right can mess up the whole of your kennel, so make sure to get it right.
First, Decide What’ll Go Into the Base of Your Dog’s Crate
A dry space for your dog is a must, no matter the weather condition. Even if it is hot or cold, your dog will need an insulated, dry place to stay comfortable.
To get this part right, pay attention to the insulation, and next, if you keep your kennel outdoors, think about the elements that’ll go in the building’s base.
The outdoor environment can affect some of the elements that have gone into building your base.
For example, if you live in an area where it rains often, you’ll need a non-toxic, water-resistant material. And not to mention, build the base somewhat higher enough so that water will not go into the kennel, which would otherwise cause flooding.
Now that the important thing is out of the way. Let’s take a look at how to build the base of your dog kennel.
To start with, cut the pieces for the base according to what we’ve mentioned on the cut list. To cut, a circular saw or a power miter saw can help.
Also, just so you know, don’t forget to wear a mask when working with a pressure-treated board.
Now once everything is in place, the 23″ side pieces should go into the 22-1/2 inches front and back pieces. This is to disguise the end grain that would be otherwise visible if seen from the front of your dog kennel.
Next Up is base assembly. To assemble the base correctly, you’ll need, in each hand, 2, 3″ galvanized wood screws. To put those screws into work, pre-drill pilot holes using a countersink drill bit, and once that’s done, you can now attach the pieces together with the screws you’ve got.
Placing the base on the floor panel is the final process on the base building. First, take the floor panel and attach it properly into the base. To attach, use 1-1/4″ galvanized wood screws and drill one screw on each side of the base.
Also, don’t forget to check whether the edges are leveled, and the base is in proper shape, a square.
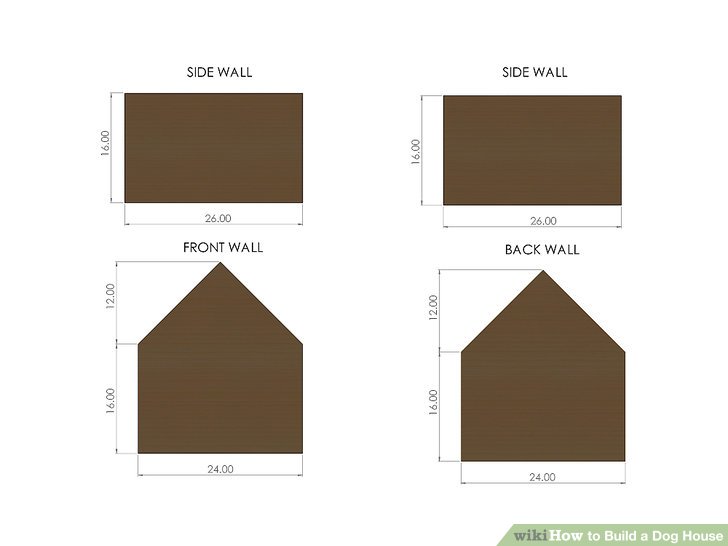
Setting Up the Four Walls
Probably the most crucial part of your dog kennel is ready. Moving to the sides is up next.
To start, take plywood. The front and back of the plywood should be a rectangle, and its size should be 24″ by 16,” and on top of this rectangle, a 12″ high and 24″ wide triangle should be attached.
- Leave an Opening in the Front Door
This is an essential part. You should not forget to keep an opening around the size of 10″ wide and 13″ high in the front wall of your dog crate. Also, at the bottom, leave a 3″ tall space to cover the base.
You’ll have to create the round arch at the opening now. To do that, try using a round object that you have in hand. For example, a mixing bowl could be handy.
- Cut Fir or Cedar Into Eight Pieces for the Framing
Take the fir or cedarwood and cut them according to what’s mentioned on the cut list.
This is used as a frame for securing the walls and roof of your dog kennel.
Now that you’ve cut them as mentioned, you should now assemble them. First, take the four corner framing pieces and bond them into four side frames using three 1-1/4″ galvanized wood screws.
Next for the side panels. Place them on the base and use galvanized wood screws to screw them in place every 4-5 inches within the perimeter.
- Attaching Both the Front and Back Panels
In the final stages now. Assemble both the front panel and the back panel of your dog kennel now. To do it, the front and back panels should be placed on the floor and attached to the framing with galvanized wood screws every 4-5 inches.
Related article: One Sheet of Plywood Projects
Building the Roof
This is the final process of building a dog kennel.
- Type of Roof to Build
Try building a roof that’s triangular, as it’ll provide more space for your pooch and, most importantly, allows rain and snow to slide down easily.
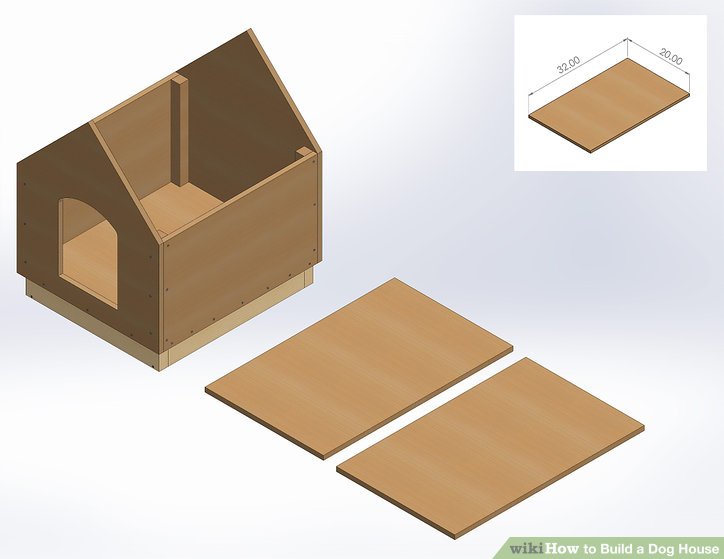
- Sketch the Plan for the Roof
The plan of the roof panels should be drawn in a 2×2 piece of wood, and the dimensions of it should be 32″ long and 20″ wide. The pieces of the roof will be placed on top of the side panels, which form a triangular sloping roof.
Don’t attach the roof yet!
- Attach the Roof Framing Piece
Before you attach the pieces of the roof, you should place the framing in place. Cut the framing as mentioned in the cut list and assemble it to the edges inside the roofline of the front and back panels. It should be leveled adequately with the edges.
Each framing piece should be positioned halfway between the top and bottom of the angled side of both the front and back panel. Place the framing in place by screwing three 1-1/4″ galvanized wood screws into each panel.
- Attaching the Roof Panels
First, try positioning the roof panels on top of each side and make sure to check whether the rooftop is joined perfectly and tight. Also, see whether the panels over each side are even. If everything’s fine, use 1-1/4-inch galvanized wood screws and fasten the roof panels to the framing pieces.
That’s it. That’s your perfect dog kennel right there. So if you’ve been thinking that building a house for your furry friend is tricky, now you know!
This dog kennel plan right here is one of the easiest out there. With the right tools, you can create one for yourself in no time.
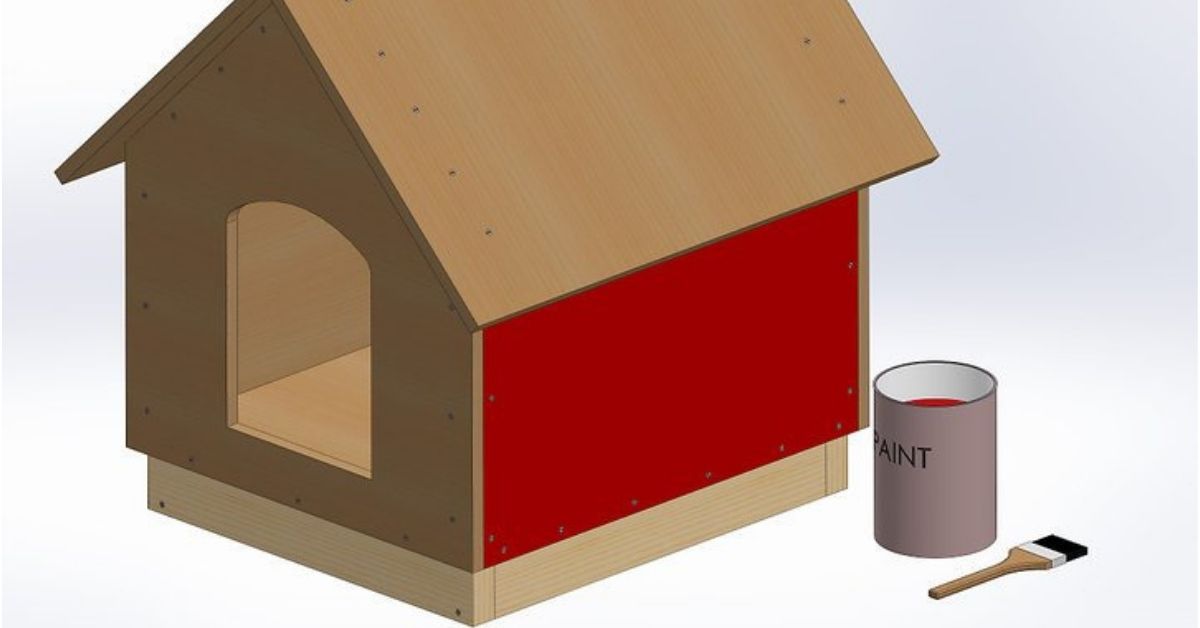
Final Touches
Now that you’ve completed building your dog’s house, it’s time to customize it and make it your dog’s own.
- Painting Your Dog Crate
The first thing after the building process is to paint your dog crate. Use non-toxic paint that won’t cause any harm to your dog. When it comes to colors, pick any color you like and go with it.
- Customizing
Make The Roof Sturdier. If you want to keep the kennel even drier, you can take advantage of the asphalt-impregnated roofing paper or tar paper. Choose any of them and cover the kennel’s entire roof with it. Once done covering, to make the dog crate look more enticing, you can even add shingles.
Make The Inside More Comfortable. You can add a dog bed, blanket, or even a piece of carpet inside your dog crate to make it more comfortable for your pooch. If you’re adding a carpet, make sure to cut it one inch smaller than the floor in all dimensions. If you want the carpet to be there permanently, you can use wood glue. If you’re going to replace it often, duct tape would be enough.
Adding Accessories. To make your dog crate look more eye-catching, you can add a nameplate with your dog’s name on it. You can even make that nameplate using the leftover woods.
REFERENCES:
- https://www.wikihow.com/images/thumb/1/16/Build-a-Dog-House-Step-1.jpg/aid127497-v4-728px-Build-a-Dog-House-Step-1.jpg.webp
- https://www.wikihow.com/images/thumb/b/bd/Build-a-Dog-House-Step-4.jpg/aid127497-v4-728px-Build-a-Dog-House-Step-4.jpg
- https://www.wikihow.com/images/thumb/f/f5/Build-a-Dog-House-Step-7.jpg/aid127497-v4-728px-Build-a-Dog-House-Step-7.jpg
- https://www.wikihow.com/images/thumb/7/74/Build-a-Dog-House-Step-13.jpg/aid127497-v4-724px-Build-a-Dog-House-Step-13.jpg